[Note - this feature is only available in Pro subscription]
Inventory Items are used in estimates and quotes. We create inventory items and create pricing for Inventory Items on the Manage Inventory page.
The Manage Inventory page consists three panels. The Inventory panel, The Inventory Info panel and the Inventory Pricing panel.
The Inventory panel displays each inventory item that you have created. The Inventory Items are sorted according to the "Code" given to each Inventory Item. Inventory Items are also managed using Types of Work, Work Stages and Cost Centres to group like Inventory Items. You can navigate through different Types of Work, Work Stages and Cost Centres using the drop-down options at the top of Inventory Panel.
To view an Inventory Item simply click the Inventory Item in the panel and the Inventory Info and Inventory Pricing for that Item will load.

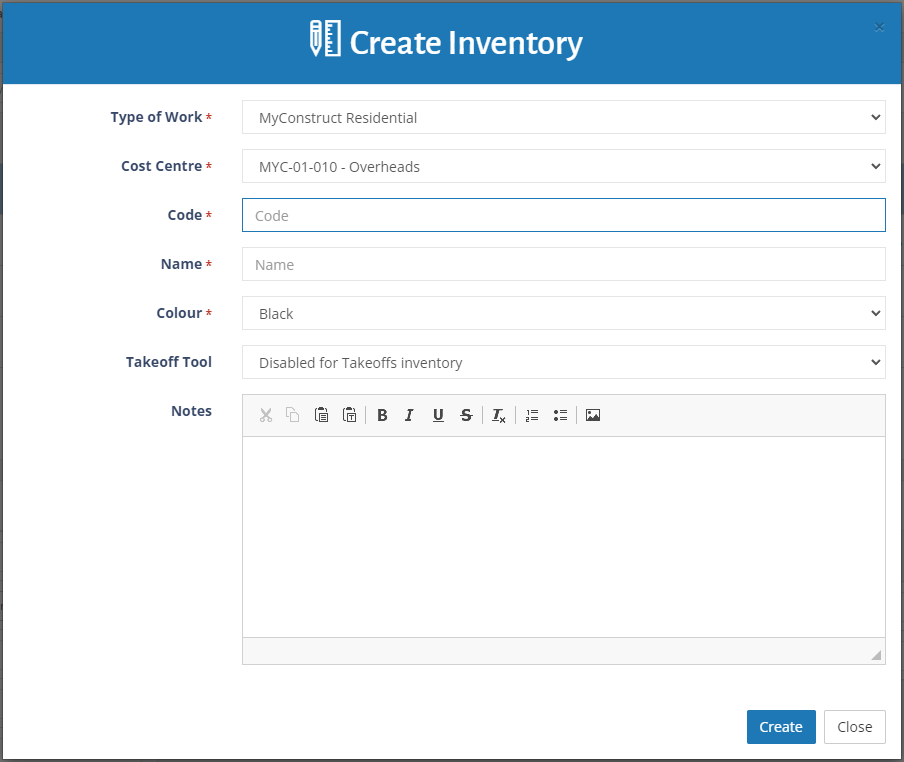
You can create an Inventory Item by clicking the "Create Inventory" button.


Name: This is the Inventory Item Name.
Cost Centre: This the Cost Centre the Inventory Item is stored in, you can also specify multiple cost centres over multiple types of work so you don't need to double enter any inventory.
Code: This is the Inventory Item Code for easily searching and identifying.
Takeoff Tool: This option specifies whether the Inventory Item is available for use in Graphical Takeoffs.
Notes: Used in the 'Notes' section below the line item on Estimates, used to include extra info such as colour, profile or options for the item. You can also insert images here and they'll show on your Estimates and Quotes.
You can also delete an Inventory Item by clicking the "Trash" button on the Inventory Item row.
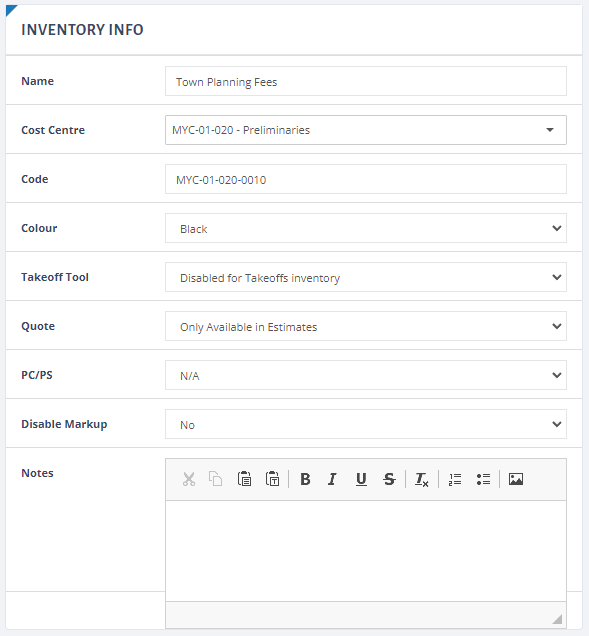
Editing an Inventory Item is easy. Just select the Inventory Item and modify the inputs in the Inventory Info panel.
Extra fields here include:
Quote: This option specifies whether the Inventory Item is available in the Quote Inventory Module.
PC/PS: This option declares the Inventory Item as either 'Prime Cost', 'Provisional Sum' or 'N/A' for normal inventory items. If you're using PC/PS items it's suggested to disable markup below for those items.
Disable Markup: The default (for non PS/PC) should be set to "No".
We recommend that your PC/PS Items should not include markup, this tool allows you to control this. Our recommendation is setting this as "Yes" for Provisional Sums and Prime Costs to remove markup / margin.
To create a price for an Inventory Item, click the 'Create Price' button.
A row will appear in the bottom right panel. This panel allows you to specify multiple prices from multiple suppliers in multiple areas. It also allows you specify the date the pricing comes into effect. 
Valid From: The date the pricing will come into effect.
Price Area: The Pricing Area this price will be used for.
Supplier: The supplier that is providing the inventory item at this price.
Price: The cost of the inventory item.
Unit: The measurement used in estimates for this price.
You can delete a price by clicking the "Trash" button on the far right of the price row.

Comments
0 comments
Article is closed for comments.